(How to configure Amazon SES and Amazon WorkMail in two different regions and combine both to send and receive emails?)
Ex:
Email sending service, Amazon SES in “US West (Oregon)” region <– For SMTP
Email receiving (MailBox) service via WorkMail in “Europe(Ireland)” region <– For IMAP
What is Amazon SES and why do we go for it?
Amazon Simple Email Service (SES) is a cost-effective, flexible, and scalable email service that enables developers to send mail from within any application. You can configure Amazon SES quickly to support several email use cases, including transactional, marketing, or mass email communications. Amazon SES’s flexible IP deployment and email authentication options help drive higher deliverability and protect sender reputation while sending analytics measure the impact of each email. With Amazon SES, you can send email securely, globally, and at scale.Oh, what are these technical words? Do not worry, I will explain as simple as that.
Amazon Web Services (AWS) Free Tier 😀
AWS provides lots of services under the free tier. You can use any of the services under Trials, 12 months free and always free
Visit AWS Free Tier Services page: https://aws.amazon.com/free
Type and search Amazon SES, or just SES in the search bar and select it, or you can go to the SES page directly by this link: https://aws.amazon.com/ses/
AWS SES provides us this much 62,000 outbound messages free. You can make it free for 12 months.
Are you sure? Yes, It is 😀
- 62,000 Outbound Messages per month to any recipient when you call Amazon SES from an Amazon EC2 instance directly or through AWS Elastic Beanstalk.
- 1,000 Inbound Messages per month
Therefore It is a cost-effective email service in the Cloud.
How to create Amazon SES account?
Simply click on “Create an AWS account” or “Sign In” if you already have an account. If you are going to create a new account, you have to make sure to provide correct information and make it done nicely.
You have to make sure to select a proper region as your requirement.
In my case assume that I have selected “US West (Oregon)” as my Amazon SES region.
After log-In to the management console of the selected region, select “Amazon Simple Email Service” under “AWS services” category.
If you wish to change your region for the SES account, you can change it too using this Management Console.
Now you are in the Amazon SES account dashboard.
Configure Amazon SES account with your domains
Select “Verified identities” under the “Configuration” menu. And then “Create Identity”.
Select the Domain as Identity type, enter your domain and “Create identity”.
Then your domain name will appear under “Verified identities” in the account dashboard.
Select the domain name you provided and enter all the DNS settings showing there into your domain name registry.
Ohh whats is the domain Name Registry?
Do not worry, it is Namecheap, GoDaddy, Amazon Route 53….or any other platforms where you registered your main domain.
Tutorial To be continued….
Addtional information section
For this tutorial and for your ease of reference assume that I have setup my domains as follows in Namecheap.

My main domain : abcd.com(Assume I have launched a website as https://abcd.com, hosted in Amazon EC2 or any VPS server)
My Email Management Application : Mautic(Assume I have setup and launched mautic server as https://mautic.abcd.com, hosted in Amazon EC2 or any VPS server).
Assume that I have lauched mautic server(https://mautic.abcd.com) to send emails to my clients. It means I have to configure Amazon SMTP credentials to mautic server to send emails.
Therefore you can understand that abcd.com as my main domain to use with my website https://abcd.com and "mautic" is my subdomain to use as https://mautic.abcd.com.
So I have to configure the DNS for main and subdomains as follows.
Type = A record, Host = @, Value = VPS IP of my main domain, website https://abcd.com
Type = A record, Host = mautic, Value = VPS IP of my mautic server, https://mautic.abcd.com
If you want to know how to configure mautic email managemet application for your business, click here. If you wish to get a service from us to configure mautic for you, click here to go to our service page
This Additional Information section is for your ease of reference only.
Tutorial Continue….
Make sure you have entered your Amazon SES, DNS settings in your DNS registry as follows:
| Verification verified | ||
| Record Type | TXT Name | TXT Value |
| TXT (Text) | _amazonses | xxxxxxxxxx |
| DKIM: enabled | ||
| Name | Type | Value |
| qazwsxedcrrfv._domainkey | CNAME | qazwsxedcrrfv .dkim.amazonses.com |
| plmoknijbuhv._domainkey | CNAME | plmoknijbuhv .dkim.amazonses.com |
| qwerasdfzxcv._domainkey | CNAME | qwerasdfzxcv .dkim.amazonses.com |
Make sure to remove your domain name showing at the end of the recode and enter the value only.
MAIL FROM Domain
When you send an email from this identity(domain), Amazon SES uses the MAIL FROM domain that you specified.
Here I will use “mautic” subdomain for Mail From Domain. So after entering “mautic” for Mail From Domain, it shows like, “Mail From Domain”: mautic.abcd.com
| MX Record Settings | ||
| Record type | Name | Value (If “priority” column there, type 10 in that and remove 10 from this value) |
| MX | mautic | 10 feedback-smtp.us-west-2.amazonses.com |
| SPF Record Settings | ||
| Record type | Name | Value |
| TXT | mautic | v=spf1 include:amazonses.com ~all |
After entering the correct DNS, make sure to wait and Verify all.
Important Notice
It is very important to have proper reverse DNS(rDNS) / ptr records, to send emails with 10/10 sending score. That was why I used “mautic.abcd.com” as my Mail From domain and I have already configured mautic.abcd.com rDNS too with my VPS server where https:// mautic.abcd.com is located.
In Namecheap:
mautic.abcd.com bind to VPS IP
(mautic.abcd.com -> XXX.XXXX.XXX.XXX)
In VPS sever:
VPS IP bind to mautic.abcd.com
(XXX.XXX.XXX.XXX -> mautic.abcd.com)
If you want to know what is rDNS, watch this video.
To have a 10/10 sending score you have to know how to configure the below things properly.
rDNS/ptr <- Explained above, you have to configure it. Watch this video for more.
DKIM <- Already configured in above DNS. Watch this video for more.
DMARK <- You have to configure it, watch this video for that.
SPF <- Already configured in the above DNS. Watch this video for more.
MX <- Already configured in above DNS.
In addition to the above, just have a look at these topics too to have a 10/10 sending score. I will explain all these topics if you need them in other tutorials.
IP Reputation, Message Body, and Email List health.
Alright, that Important Notice is over. Back to the tutorial.
What to do next?
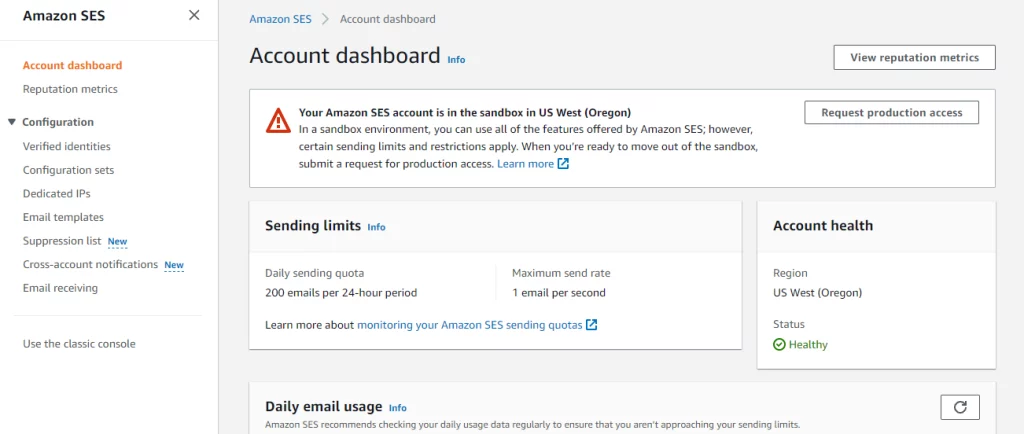
How to get the production access, remove the sending limits and restrictions?
(How to move out of the sandbox?)
As you can see in the picture above, you can send 200 emails per 24-hour period at the rate of 1 email per second only. Also, you can not send emails to outside email addresses which are not verified and port 25 is restricted too. It means your Amazon SES account is in the sandbox for the particular region.
Request for production access by simply clicking on the “Request production access” button. You have to clearly explain how you are going to use Amazon SES.
What do you have to consider when sending a request?
- How do you plan to build or acquire your mailing list to send emails?
- How do you plan to handle bounces and complaints?
- How can recipients opt out of receiving email from you?
- How did you choose the sending rate or sending quota that you specified in this request?
They want to make sure you are not spamming or not using this service for any unwanted things. You have to be genuine and realistic for the service. Therefore, explain your genuine intentions and real scenarios to access that. They will definitely approve your request. Once rejected, again request for that. Watch this video for more.
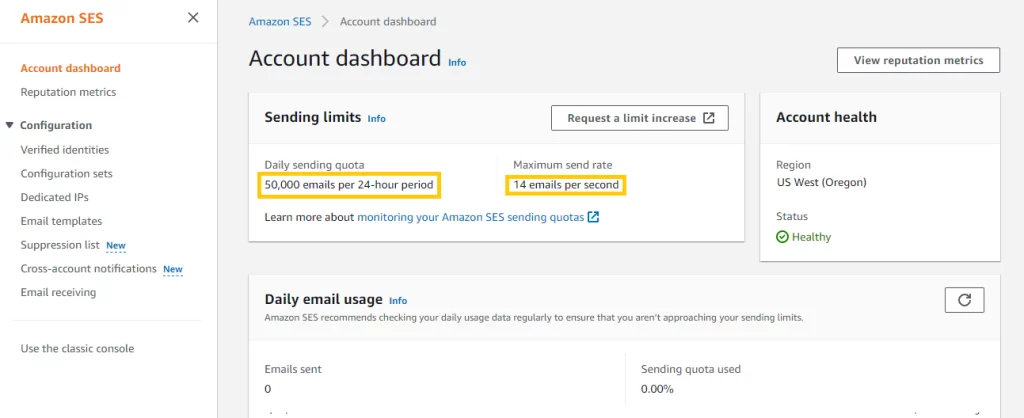
After they approve your request, you may get about 50,000 emails per 24-hour period with 14 emails per second rate or more.
All these for 12 months free 😀
Ok, if you are out of the sandbox now, Great! You are almost done. 😀
How to get SMTP credentials and configure it to send emails?
Go to the Amazon SES account dashboard and scroll down to “Simple Mail Transfer Protocol (SMTP) settings“.
Click on “Create SMTP credentials” -> then create.
Download the credential file for later use. If you lost the credentials, you may have to create a new one for that.
You may see other relevant information like “SMTP endpoint”, “TLS” and Ports(25) in the above SMTP settings.
DONE. GREAT! ! Your Amazon SES is ready to use. ✔️
You can enter these SMTP credentials in any SMTP email sending application or in your website SMTP plugin to send emails.
In my case, I enter these credentials in my mautic email management application(https://mautic.abcd.com) and in my website plugin(https://abcd.com). So then I can send emails to any correct emails addresses from my website and mautic server.
The best practice is to test emails sending score before sending emails to outside email addresses. You can use Email-Tester to test sending score.
Also, you can check whether the emails are landing into the inbox properly using GMASS.
>> Sending Emails ✔️
If you plan to setup the Amazon SES/Amazon Work Mail, or any Email Marketing System or get any service from us, Feel free to send your details using this form. Join our Newsletters to receive valuable posts and product announcements.
Ok. now what next?
Recieving Emails, Amazon SES
The email sending part is done. If you wish to have a MailBox(Inbox) to check the received emails, It means simply if you want to receive emails to your domain email addresses, then the next part is good for you.
If you want to get more information(about receiving emails) via the Amazon documentation website, click here.
What are the options to recieve emails?
- Using Amazon Route 53, Visit for more information.
You have to register your domains in Amazone Route 53 or transfer your existing domains to Amazon Route 53 to get the service. This is a paid service. See the pricing. - Directly using Amazon WorkMail.
You can getthe service without transfering the domains to Amazon Route 53. This is also a paid service. See the pricing.
Amazon SES doesn’t include POP or IMAP servers for receiving incoming emails. This means that you can’t use an email client such as Microsoft Outlook to receive incoming emails. If you need a solution that can both send and receive emails by using an email client, consider using Amazon WorkMail
How to configure Amazon WorkMail?
Amazon WorkMail is not available in every region of Amazon SES. Therefore we have to select a region where Amazon WorkMail is available. Amazon WorkMail is connected with Amazon SES. So when you are going to create an amazon WorkMail account, it is creating an Amazon SES account too with the Amazon WorkMail in the particular region.
Here I am going to show you how to configure an already created (different region) Amazon SES account with an Amazon WorkMail account created in another region.
It means:
Amazon SES configured in “US West (Oregon)” region.
Amazon WorkMail configured in “Europe(Ireland)” region.
And both are connected to send and receive emails for the abcd.com domain.
I hope you got the idea. 😀
Ok, we will start.
Go to Amazon WorkMail -> Sign In or “Complete Sign Up
Create organization -> Select External Domain(If your domains registered with an external DNS provider) -> Enter the Domain Name -> Create organization.
Then you may redirect to the organization page which your domain name displays.
Click on the domain name.
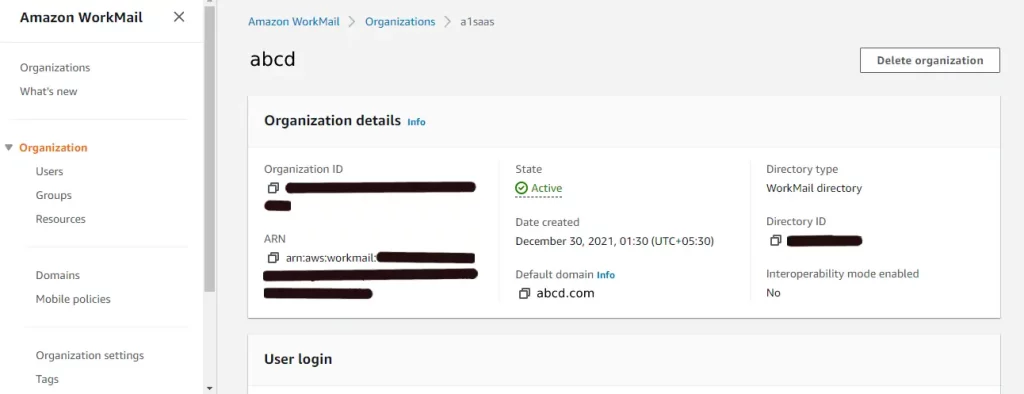
Click on the “Domains” under the organization on the right side.
You may see your_domain.com and your_domain.awsapps.com.
In my case:
- abcd.com and
- abcd.awsapps.com.
You may see both of your domain statuses are NOT verified yet.
Click on your_domain.com. In my case abcd.com.
Enter all the DNS settings into your DNS registry as follows.
Assume that I have already configured the DNS settings described in the email sending process of the tutorial. And I have selected “Europe (Ireland)” region for my WokMail.
In that case, assume that:
My Amazon SES was configured in “US West (Oregon)” region.
Amazon WorkMail is to be configured in “Europe(Ireland)” region.
| Domain ownership | ||
| Type | Record name | Value |
| TXT | _amazonses | efAADDDHJefAAPPEE+efYYDDpwdwd= |
| WorkMail configuration | ||
| Type | Record name | Value (If “priority” column there, type 10 in that and remove 10 from this value) |
| MX | @ | 10 inbound-smtp.eu-west-1.amazonaws.com. |
| CNAME | autodiscover | autodiscover.mail.eu-west-1.awsapps.com. |
| Improved security – recommended | ||
| Type | Record name | Value |
| CNAME | 2DddvWDD_domainkey | 2DddvWDD.dkim.amazonses.com. |
| CNAME | dfgrgrzazrt._domainkey | dfgrgrzazrt.dkim.amazonses.com. |
| CNAME | eerereree._domainkey | eerereree .dkim.amazonses.com. |
| TXT | @ | v=spf1 include:amazonses.com ~all |
| TXT | _dmarc | v=DMARC1;p=reject;sp=reject;pct=100;adkim=r;aspf=r;rua=mailto:admin@abcd.com;ri=86400;fo=1 |
Make sure to remove your domain name showing at the end of the recode and enter the value only.
MAIL FROM Domain
When you send an email from this identity(domain), Amazon SES uses the MAIL FROM domain that you specified.
Here I will use “mautic” subdomain for Mail From Domain. So after entering “mautic” for Mail From Domain, it shows like, “Mail From Domain”: mautic.abcd.com
| MAIL FROM domain | ||
| Type | Record name | Value (If “priority” column there, type 10 in that and remove 10 from this value) |
| MX | mautic | 10 feedback-smtp.eu-west-1.amazonses.com. [DO NOT ENTER this Value into your DNS registry. Because you already have entered a value for “mautic” when you are setting up the DNS for sending emails. That is “10 feedback-smtp.us-west-2.amazonses.com” in my case. You have to keep the value entered when you were setting up the Amazon SES] |
| TXT | mautic | v=spf1 include:amazonses.com ~all |
Then “MAIL FROM domain” will be verified with “Inconsistent” error message following to MX record.
And after enetring all the details wait till all the DNS verified. You can refresh the page to see it.
After your your_domain.com verified, do the same thing to your_domain.awsapps.com domain too to verify. Click on the “Domains” under the organization on the right side of the organization page. See the above image . No need to add any configuration to Mail From Domain of that. Keep it as it is.
Great! You are almost done 😀
Adding the SMTP service to WorkMail
Click on the “Organization settings” under the “organization”, on the right side of the organization page.
Click on “SMTP Gateways” and “Create Gateway”->Give the SMTP credentials of Amazon SES(other region) we created and configured earlier.
In my case I am providing SMTP credentials of Amazon SES in “US West (Oregon)” region to this Amazon WorkMail in “Europe(Ireland)” region.
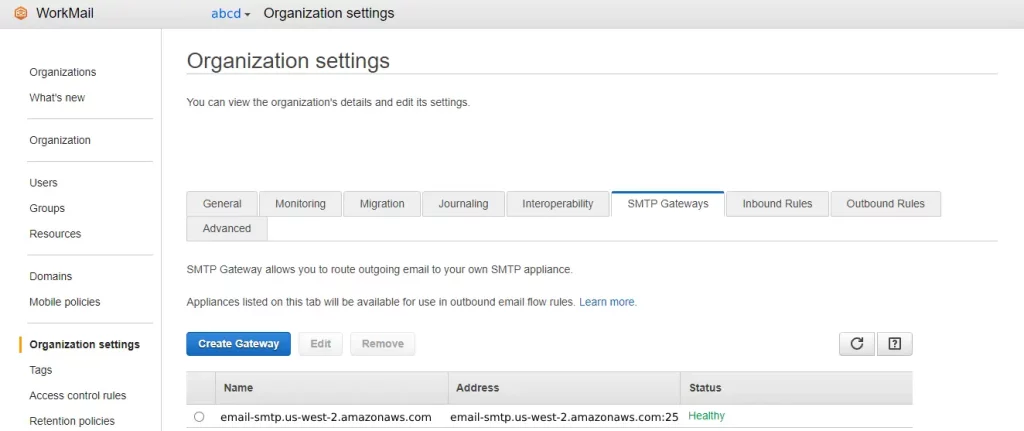
Email sending through the Amazon SES SMTP service in “US West (Oregon)” and email recieving to to Amazon WorkMail in”Europe(Ireland)” region.
Creating WorkMail users
Click on the “Users” under the “organization”, on the right side of the organization page.
Create users assigning your domain email addresses to them. In my case admin@abcd.com, mail@abcd.com etc.
These users can log-in and see their MailBoxes(Inboxes) later.
All Done, GREAT! 😀
>> Recieving Emails ✔️
All the configuration parts are done. We will see how to send and see the emails recieved.
How to Send and Recieve emails?
Email sending
- You can directly use and configure the SMTP settings of Amazon SES created earlier with any email sending application to send emails.
- You can configure Amazon WorkMail outgoing SMTP server credentials with any email sending application to send emails. Check this link on how to setup email clients.
- Simply you can use webmail of Amazon WorkMail for this.
Log-in to Amazon WorkMail webmail application using the credentials created when we created the users and send emails.
In my cae it is, https://abcd.awsapps.com/mail.
You can see your webmail page link under “User login” in organization page.
Email recieving
- Use webmail of Amazon WorkMail for this.
Log-in to Amazon WorkMail webmail application using the credentials created when we createed the users and see the recieved emails.
You can see your webmail page link under “User login” in organization page. - You can configure Amazon WorkMail with email management applications(email clients) and see the recieved emails.
Check this link on how to setup email clients.
Enjoy email sending and receiving with Amazon SES, Amazon WorkMail 😀.
Thank you!
Pingback: How To Create 100% FREE Business Email & Use it with Gmail
Hello my friend! I wish to say that this article is awesome, great written and come with almost all significant infos.
I would like to peer more posts like this .
Hello My Friend!
Thank you for your kind words, greatly appreciated!
Cheers!
I love what you guys are up too. This kind of clever work and
coverage! Keep up the excellent works guys I’ve included you guys to our blogroll.