In this Step by Step Guide, I will show you how to set up a Free SMTP server using Postal, the open-source SMTP software, and connect it to your email marketing application to Send Unlimited Emails*.
There are several methods to build SMTP servers, in this guide I will build the SMTP server using a free open source software called “Postal“.
Postal is a fully-featured open source mail delivery platform for incoming & outgoing e-mail and gives you all the tools and features needed to build a full mailing system for your business.
What is the SMTP Server?
I don’t like robotic definitions like Wikipedia, I love to make things simple. So…
Simply, SMTP is the thing that allows you to send emails over the internet.
SMTP stands for “Simple Mail Transfer Protocol”. It’s a Concept in Networking that you don’t have to worry about.
Just to know that SMTP is the technical thing that is responsible for delivering emails over the internet.
How this is related to email marketing?
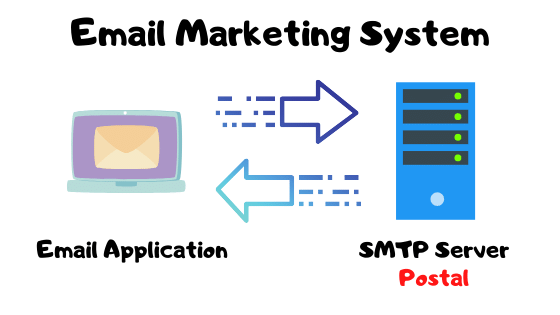
Any Email marketing system consists of two parts:
- The sender: (SMTP service) this is the technical part. It allows you to send emails over the internet.
- The Management Application, where you can configure and manage your Email Lists, Marketing Campaigns, monitor and analyze results, manage your sending servers, and so on.
So we connect both together to get an Email Marketing System.
So now I think It’s SUPER clear, we are going to learn how to build the first part of any email marketing system which is the SMTP server.
What do we mean by Sending Unlimited Emails?
When we say unlimited emails, this means that we can send unlimited emails from our server, there are no restrictions by companies or monthly plans to buy or so.
It’s your own server, you can send as much as your server can handle in terms of resources. so when you have more (CPU and RAM), you can send more emails and so on.
Setup the SMTP Server, Let’s Start!
Ok, So Let’s start the real work! but before, you need to know what is required.
Requirements to Setup SMTP Server.
In order to Build and Setup an SMTP Server, you will mainly need two things:
- A Domain name
- VPS Server with port 25 opened.
1. Domain name
When you send emails, you will be sending from an email address like this one:
admin@a1saas.comSo in my case, “a1saas.com” is the domain name that I use to send my emails. so simply it’s required to have a domain name to use when you send emails from your SMTP server.
So if you don’t have a domain yet, go and get one NOW! in order to continue the Setup. You can get the domains from DOMAIN REGISTRATION PROVIDERS like Namecheap, GoDaddy, freenom, Enom and, Google Domain, etc.
Got a Domain? Great! ✔️ Let’s continue.
2. VPS Server with Port 25 opened.
The second thing you will need is a VPS(Virtual Private Server). a public server to install & Setup SMTP on.
So when you get a VPS server, just make sure that the company allows Port 25 and never blocks it, because some companies do this to protect from spammers.
You can get a VPS server from VPS server companies like Contabo, AWS EC2, Digital Ocean, InterServer, Host Wind , OVH, etc. There are a lot of companies, you can select one as you prefer.
After you select your VPS company, just create a VPS Server with the following specifications:
- Ubuntu 18 x64 as your operating system
- You can start with 1 CPU/2 GB RAM (And resize later).
Got your VPS? Great! ✔️ Let’s continue.
VPS Server basic configuration.
Note:
For the tutorial purpose, my main domain is abcd.com. I will set up my postal server in postal.abcd.com as “postal” is the subdomain. You can use any name for the domain and subdomain as you wish.
Now we have our new Ubuntu VPS server, Let’s prepare it for our Setup.
Connect to your server, using an SSH client like putty or bitvise.
First, check your hostname:
hostname -f
If you don’t see a pattern like ANYTING.YOURDOMAIN.COM, then you need to change the hostname using the following command:
sudo hostname host.domain.tld
Where the host is anything you want. So in my case, my sample domain for this tutorial is abcd.com, and the subdomain for the setup is postal, then the command will look like this:
sudo hostname postal.abcd.com
[This will configure rDNS/ptr records (apply for some VPS companies only), which are relevant to have a 10/10 email sending score]
Map your domain name.
Go to your domain registration provider, and set these records.
| Type | Host | Value |
| A record | @ | Your main domain IP |
| A record | postal | VPS IP for reserved for postal setup |
Done? ✔️ Let’s continue.
If you wish to setup Postal or any Email Marketing System or get any service from us, Feel free to send your details using this form. Join our Newsletters to receive valuable posts and product announcements.
Setup Free SMTP Server
The VPS is ready, and we can start the installation process. So in order to setup the SMTP Server on our VPS, we need to install an SMTP software.
Install Postal Free SMTP Software
Prerequisites
Postal runs entirely using containers which means to run Postal you’ll need some software to run these containers. We recommend using Docker for this purpose but you can use whatever software you wish.
To install docker, run the below commands. (NOTE: Each command starts with a “–”, remove stating “-” when executing the commands)
-sudo apt-get update
-sudo apt-get install \
    apt-transport-https \
    ca-certificates \
    curl \
    gnupg \
    lsb-release
-curl -fsSL https://download.docker.com/linux/ubuntu/gpg | sudo gpg --dearmor -o /usr/share/keyrings/docker-archive-keyring.gpg
-echo \
  "deb [arch=amd64 signed-by=/usr/share/keyrings/docker-archive-keyring.gpg] https://download.docker.com/linux/ubuntu \
  $(lsb_release -cs) stable" | sudo tee /etc/apt/sources.list.d/docker.list > /dev/null
-sudo apt-get update
-sudo apt-get install docker-ce docker-ce-cli containerd.io
-sudo curl -L "https://github.com/docker/compose/releases/download/1.29.2/docker-compose-$(uname -s)-$(uname -m)" -o /usr/local/bin/docker-compose
-sudo chmod +x /usr/local/bin/docker-compose
-docker-compose --version
System utilties
There are a few system utilities that you need to have installed before you’ll be able to run some of the Postal commands.
apt install git curl jqGit & installation helper repository
Make sure you have git installed on the server by running the below commands.
-git clone https://postalserver.io/start/install /opt/postal/install
-sudo ln -s /opt/postal/install/bin/postal /usr/bin/postal
Maria DB
You can run MariaDB in a container, assuming you have Docker, using this command. Copy and paste this all in Putty.
docker run -d \
   --name postal-mariadb \
   -p 127.0.0.1:3306:3306 \
   --restart always \
   -e MARIADB_DATABASE=postal \
   -e MARIADB_ROOT_PASSWORD=postal \
   mariadb
(Note that, this is a one-line code)
This will install your postal database on MariaDB.
RabbitMQ
RabbitMQ is responsible for dispatching messages between different processes. As with MariaDB, there are numerous ways for you to install this. For this guide, we’re just going to run a single RabbitMQ worker. Copy all the below as one command and paste on putty.
docker run -d \
   --name postal-rabbitmq \
   -p 127.0.0.1:5672:5672 \
   --restart always \
   -e RABBITMQ_DEFAULT_USER=postal \
   -e RABBITMQ_DEFAULT_PASS=postal \
   -e RABBITMQ_DEFAULT_VHOST=postal \
   rabbitmq:3.8
(Note that, this is a one-line code)
Installation
Run the command below and replace postal.yourdomain.com with the actual hostname you want to access your Postal web interface at. Make sure you have set up this domain with your DNS provider before continuing.
postal bootstrap postal.YOURDOMAIN.COMIn my case, it is
postal bootstrap postal.abcd.comInitializing the database
Run the following commands to create the schema and then create your first admin user.
postal initialize
postal make-user
Running postal
You’re now ready to run Postal. You can do this by running:
postal startThis will run a number of containers on your machine. You can use postal status to see details of these components.
Installing WEB Client
You can use any web client to run postal on your web, but in this guide, we are going to use Caddy. Install it with an SSL using the below command.
docker run -d \
   --name postal-caddy \
   --restart always \
   --network host \
   -v /opt/postal/config/Caddyfile:/etc/caddy/Caddyfile \
   -v /opt/postal/caddy-data:/data \
   caddy
(Note that, this is a one-line code)
Once this has started, Caddy will issue an SSL certificate for your domain and you’ll be able to immediately access the Postal web interface and login with the user you created in one of the previous steps.
Configure Postal SMTP
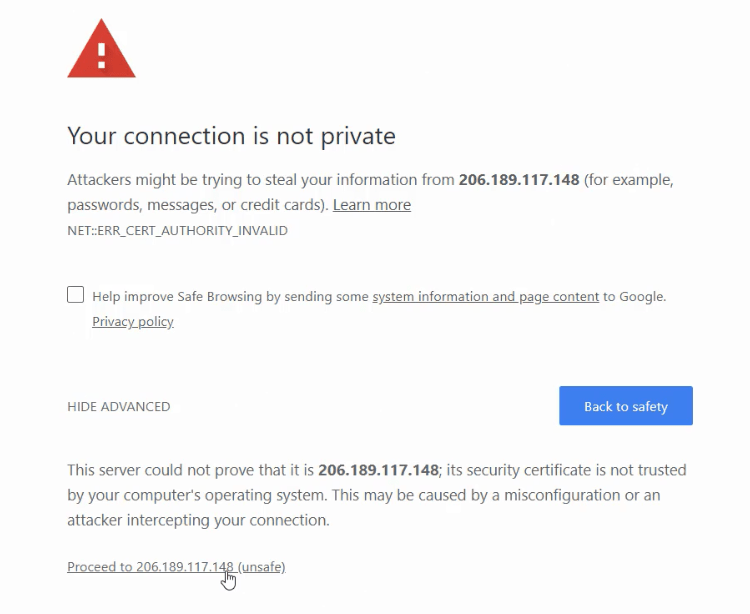
Now, Open your Internet browser, and navigate to your Server IP URL or Subdomain like this:
https://YOUR_SERVR_ADDRESS
YOUR_SERVR_ADDRESS: Your VPS IP address or, postal.abcd.com in my case.
You will notice an SSL warning, It’s ok just proceed as you see in the image below:
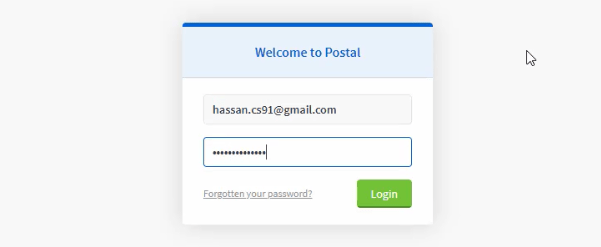
And then the Postal Login Screen will open, enter your email and password that you created during the setup.
And Now, you are inside Postal, click “Add Organization” to add one.
Then Click on Build Mail Server and enter the name, and set it to live mode
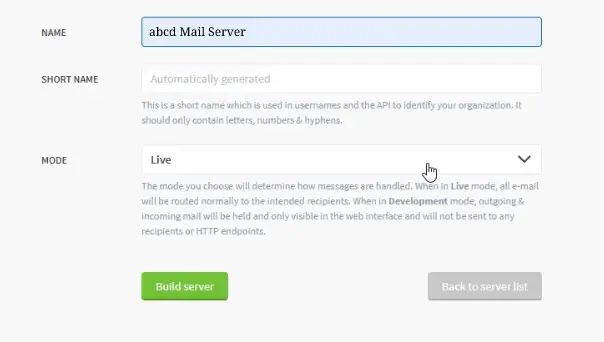
So Simple. ✔️
Postal Domain Configuration
Now, Click On Domains to add your domain name into Postal
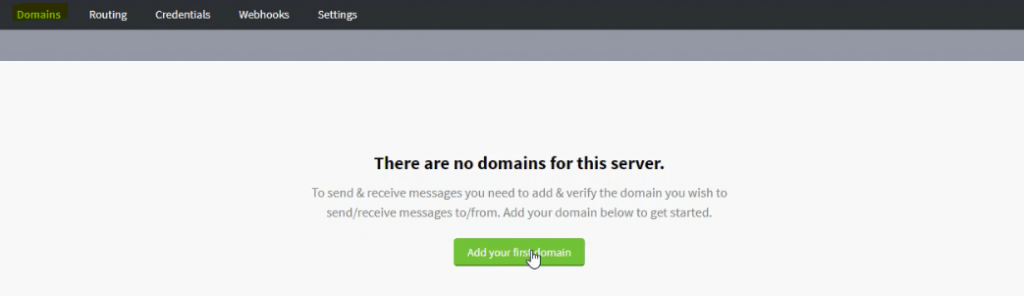
Enter your Domain name that you want to use to send emails, and Click Create Domain.
Then, Postal will show you the Domain page with the records that you need to configure.
So, What you need to do simply, is to copy these records and paste into your DNS Zone. And then your server will be ready to send emails! but before that, what are SPF and DKIM?
What is DKIM? Watch this video for more information.
What is SPF? Watch this video for more information.
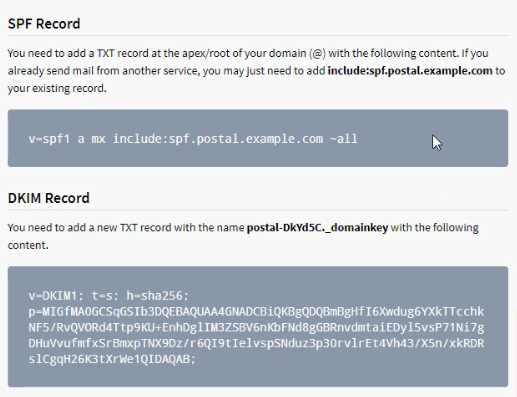
Setup DKIM for Postal
What’s nice about Postal, is that DKIM is already configured and the keys are generated, you just need to copy the DKIM record to your DNS Zone.
| Type | Host | Value |
| TXT | postal-DkYd5C._domainkey | wwrwrwerbyjyjty |
Setup SPF for Postal
To set up SPF. add the following record into your domain registration provider:
v=spf1 a mx ip4:XXX.XXX.XXX.XXX -all
*Replace with your VPS server IP.
or
You can change and add your record like this
v=spf1 a mx include:spf.postal.abcd.com ~all
(Change it according to your domain)
| Type | Host | Value |
| TXT | @ | v=spf1 a mx ip4:XXX.XXX.XXX.XXX -all or v=spf1 a mx include:spf.postal.abcd.com ~all |
(If you aready have an SPF record for your Host in your DNS registry, you can add “include:spf.postal.abcd.com” to the existing record)
Now only your server can send emails from your domain.
If you have noticed, the Postal will give you an example SPF to copy, and it looks like this:
v=spf1 a mx include:spf.postal.example.com ~all
This is just an example domain, and you need to change this in the postal config file first to match your domain name. How?
Edit Postal config file.
To Edit the Postal Configuration File, we will need to connect to our server using a File manager to make things easy.
So, You can Use WinSCP, a free remote file manager, to connect and edit the files on the server.
Open WinSCP, and Connect to your server using the root credentials. and go to: /opt/postal/config Directory. Then Open the postal.yml file.
If you are unable to do it using WinSCP, you can do it using VIM orVI commnds via Putty.

Then, right-click and edit the file.
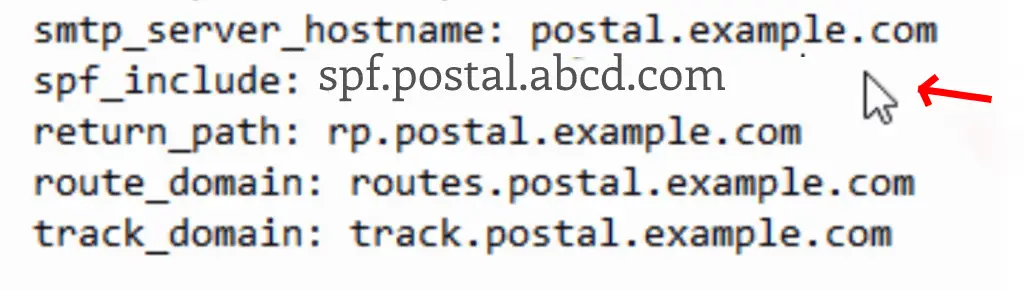
As you can see, just change the example domain with your domain name.
After that, you need to restart postal for the configuration to take effect.
So run this command on your server using the SSH client(Putty).
postal restart

Very Nice! ✔️
Now our Server is ready for testing.
Finally! Send a Test Email
Postal has built-in functionality to test sending emails, simply click on Messages, then on Send Message to test out Free SMTP server!
From : anything@abcd.com(your domain email)
To : any email address
And then “Send Message:.
Wow!
Now you may be wondering how to use this SMTP as a relay to send emails from any email marketing application.
The Answer is simply by creating “Credentials” inside Postal to connect and authenticate to our Free SMTP Server.
Create Postal Credentials to Relay Emails
To create credentials, simply click on Credentials, then Add new Credentials.
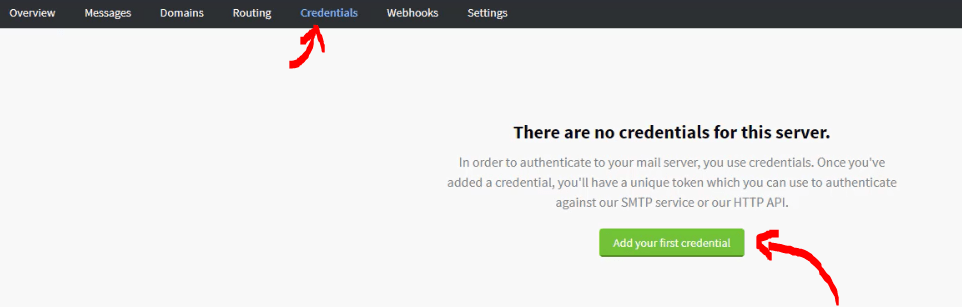
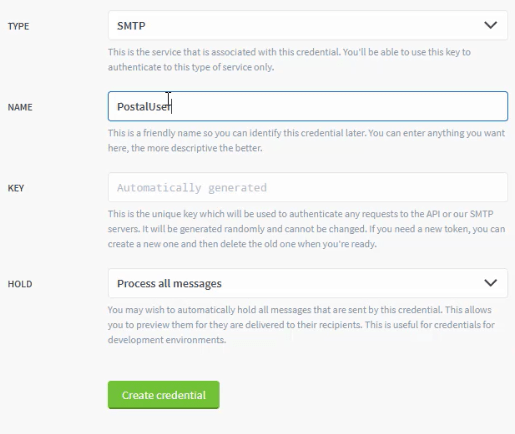
For the Type, Select SMTP.
You can also select API if you wanna connect to postal through the API or develop your own application that works with Postal. Read more about the API here.
Enter a User (Anything you want)
And the Key, is the password, you can keep it as “automatically generated“
And that’s it, you can now use these credentials in any email marketing application.
Relay a Test Email
Simple, Go to SMTPER.NET and enter your server details as follows:
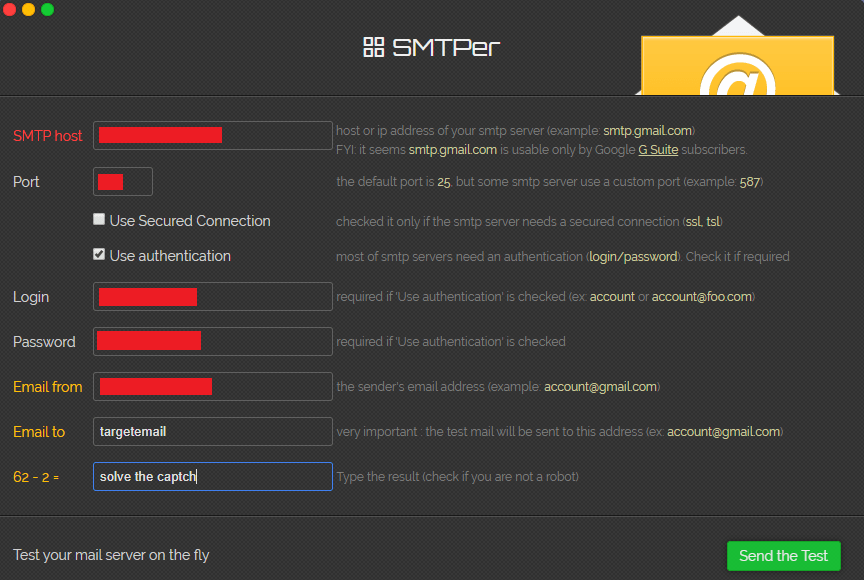
- SMTP Host: Your Server IP or Domain.
- Port: 25 or 2525
- Login: The User You entered in credentials.
- Password: The User Password.
So, these are the credentials that you can use in any Email Sender Application.
That’s it! I hope everything was simple and clear. we finish setting up the Free SMTP Server!
Enjoy! Free email with Postal.
Optional (IF YOU USE NGINX): Secure with a Free SSL.
SSL certificates are used within web servers to encrypt the traffic between the server and client, providing extra security for users accessing your application. Let’s Encrypt provides an easy way to obtain and install trusted certificates for free.
Connect to your Server using Putty SSH client. and Let’s Start!
Step 1 — Install the Let’s Encrypt Client
Let’s Encrypt certificates are fetched via client software running on your server. The official client is called Certbot.
Install Certbot by running this command:
apt -y install certbot
Certbot is now ready to be used. ✔️
Step 2 — Get the SSL Certificate
But, before we get an SSL Certificate, we need to stop nginx service since its using port 80 which certbot will use. so Let’s stop it temporarily by running the following comnad:
sudo systemctl stop nginx
Now let’s install the certificate, run the following command:
certbot certonly --standalone -d postal.abcd.com
Replace “postal.abcd.com” with your domain.
And follow the wizard. Then certbot will issue a certificate for your domain.
Step 3 — Configure the SSL Certificate
After we got the SSL certificate, we need to configure it in our server.
Let’s start the nginx service again:
sudo systemctl start nginx
Now, Open WinSCP again to edit some files on our server.
(You can use VIM or VI commands with Putty instead of WinSCP)
Connect to your server, and go to /etc/nginx/conf.d directory.
In this folder, create a new file and name it: “postal.abcd.com.conf“
Replace “postal.abcd.com” with your domain.
Then, Simply copy the following code and paste inside the file.
server {
    listen [::]:80;
    listen 0.0.0.0:80;
    server_name postal.abcd.com;
    return 301 https://$host$request_uri;
}

server {
    listen [::]:443 ssl;
    listen 0.0.0.0:443 ssl;
    root /opt/postal/public;
    server_name postal.abcd.com;
    ssl_certificate      /etc/letsencrypt/live/postal.abcd.com/fullchain.pem;
    ssl_certificate_key  /etc/letsencrypt/live/postal.abcd.com/privkey.pem;
    ssl_protocols TLSv1.2 TLSv1.1 TLSv1;
    ssl_prefer_server_ciphers on;
    ssl_ciphers EECDH+ECDSA+AESGCM:EECDH+aRSA+AESGCM:EECDH+ECDSA+SHA512:EECDH+ECDSA+SHA384:EECDH+ECDSA+SHA256:ECDH+AESGCM:ECDH+AES256:DH+AESGCM:DH+AES256:RSA+AESGCM:!aNULL:!eNULL:!LOW:!RC4:!3DES:!MD5:!EXP:!PSK:!SRP:!DSS;

    location / {
       client_max_body_size 50M;
       try_files $uri $uri/index.html $uri.html @puma;
    }

    location /app/assets {
       add_header Cache-Control max-age=3600;
    }

    location @puma {
        proxy_set_header X-Real-IP  $remote_addr;
        proxy_set_header Host $host;
        proxy_set_header X-Forwarded-For $proxy_add_x_forwarded_for;
        proxy_set_header X-Forwarded-Proto https;
        proxy_pass http://127.0.0.1:5000;
    }
}
And save the file.
The last step is to restart and enable nginx again. Simply run the following command:
systemctl restart nginx
Then this command:
systemctl enable nginx
And Awesome, Now you can test your secure Postal website!
Good Luck!
Saved as a favorite, I love your site!
Thank you! good luck!
I have a question…Can I use a domain with my name on it when I set up my SMTP Server using Postal? So for example can I choose my domain as John@Emailmarketing1.com? So rather than using something like Contact@Emailmarketing1.com? This way the email is more personalized and it looks like someone is actually reaching out to them through cold email rather than some generic domain?
Yes, of course, you can use any name with your domain.
Ex: john@yourdomain.com, derek@yourdomain.com, admin@yourdomain.com
Good blog you have here.. It’s difficult to find good quality writing like yours these days. I really appreciate people like you! Take care!!
Thank you and appreciate it! good luck!
Are you writing the articles in your website yourself or you outsource them?
I am a blogger and having difficulty with content.
Other bloggers told me I should use an AI content writer, they are
actually pretty good. Here is a sample article some bloggers shared with me.
Please let me know what your opinion on it and should I go ahead and use AI
Hello Friend,
I am writing the articles by myself without any AI tools.
But using AI tools for content writing is great. But it depends. If your content is something like you are sharing your practical knowledge and experience or you are sharing something you know very well (from your experience or knowledge via deep research/learning), then the concept of using AI tools is not subjected there.
If your content has something like you no need to have prior knowledge or experience to write it down, then it is somewhat ok to use AI tools for that.
If your content has something like you know the content to be written up to some extent there in the given topic but you need real or customized explanations/definitions with specified words/paragraphs, then you can use AI tools for these contexts.
There are some situations where you can apply, you can not /shouldn’t apply, and better not to apply the AI tools, etc. There are some situations where the human eye/mind(thinking) and interaction are needed to correct the flow of the content. There are some situations where prior practical knowledge(from deep research/learning) and experiences are only to be applied when writing the particular content.
There are so many things like these that we can consider using AI tools.
Thank You!
I have a postal smtp mail server. I defined my domains on this server. but the credential of the credential accounts that I have defined for sending mail in the domains seem to be open. How can we mask these credentials?