Do you need to create a FREE Business Email Address? A professional email address is very important when you’re trying to win new clients and grow your business very well. If you know how to do it properly, you can create more business email addresses for 100% FREE.
By the way, do you know that Your Email Address reflects your entire Business?
Yes, it is.
I did some research on How to Create Free Business Emails. As a result of that, this step-by-step guide was created. In this guide, I am showing you how to create FREE business email addresses at your own domain. This will make your business look professional and trustworthy.
First, let’s clear up a few questions about email addresses and domains.
What Is a Business Email Address and Why Is It Important?
A business email address is an email address that uses your own business domain name. So you’ll need to create the domain first, then create the mailbox to match.
For example, admin@a1saas.com is an email address linked to the domain name a1saas.com
There are a few reasons why using your own domain is very important:
- It looks more professional than a Gmail or Hotmail address.
- Free emails(Gmail, Hotmail, etc)are looking cheap and they are more at risk for hacking.
- Business domain names are easy to remember.
- Having a branded email address builds trust.
- Each email you send helps to promote and build your brand.
So, your domain emails are very important for your business.
Therefore, you’ll need to have a unique domain name(business domain) to create your own email address for your business.
Let’s move on and find out how to create your domain and business email.
Free Business Email… Wait, What is Free?
Just to clarify – You could get a free email that ends in @gmail.com, or @yahoo.com, but that could look pretty unprofessional as explained above. Therefore, before going to create a free business email, you’ll need to have your own domain name for that. In my case, it is a1saas.com.
To have your own domain, you’ll have to buy the domain from a domain registry service. Therefore, you’ll have to pay for the domain registry services anyway.
Note that – If you have bought your own domain name, you could build your business website too under your domain name.
Ex:
My domain – a1saas.com
My email – admin@a1saas.com
My website – https://a1saas.com
If you bought your domain for your business website or email, you’ll need to pay for the business domain periodically (For 6 months, 1 year, 3 years, etc). That’s all, after buying the domain, the business emails can be configured 100% FREE.
Extra Topic : How to Get a Domain Name then?
Getting a Domain is as simple as eating a piece of chocolate cake. You need to go to any Domain registry services like Namecheap, GoDaddy, Enom, Freenom, Google Domain, etc and buy a Domain Name, you can even get one for 1$ per year.
One last tip. When you create an email address, try to make the domain part unique to your business and easy to spell. You’ll also need to choose a domain name extension. I recommend that you choose .com.
Note That :
Below I have explained to you 4 Methods as Method 1, Method 2, Method 3 and Method 4, to create business email addresses. If you follow the 3rd Method(Method 3) of them, you can create your own domain by the services explained in that method too. But anyway, you can create your own domain using the above-mentioned domain registry services and configure it later on with the services mentioned in that Method too.
That’s an extra topic. Let’s discuss our main topic and go to the practical steps which are next.
How to Create a Free Business Email Address
I’ve already done all of the research for you, and I’ve got 4 different methods you can use to create your own business email addresses.
Here’s a list of all the steps.
- Method 1: Domain Email Forward to Gmail. Send and receive your business emails using Gmail. – 100% FREE, You can use your existing domain if you already have bought it.
- Method 2: Configure your domain with Zoho Mail – 100% FREE, You can use your existing domain if you have already bought it.
- Method 3: Setup your business email with Email Hosting or Website Hosting Service – You have to pay for the email or web hosting only. Some of them provide free domains(forever free or 1 year free etc) or you can use your existing domain. Anyway, they provide free email accounts. Email/ Web hosting services : IONOS, Bluehost, Hostgator, DreamHost.
- Method 4: Setup “Hestia” open-source Linux web server control panel, create your Business Email Addresses with “Hestia” and send & receive emails using the “Hestia” Webmail. Totally FREE.
In this step-by-step guide, I have given you complete guidance for Method 1. But I have given you more resources for Method 2, Method 3, and Method 4 as well.
Method 1: Domain Email Forward to Gmail
Step 1: Buy a new domain or use the already bought one
If you have not bought any domain name for your business yet, you can go to any domain registry services like Namecheap, GoDaddy, Enom, Freenom, Google Domain, etc and buy a Domain Name for you. You can even get one for 1$ per year.
I do recommend getting a .com domain that reflects your business.
If the domain part is done, let’s move to the very important steps next.
Step 2: Choose your mail forward service
I have done some research for you, and I’ve got 5 Email Forwarding/Routing Services that you can use for FREE and reliably.
- ImprovMX.com – improvmx.com
- ForwardeMail.net – forwardemail.net
- Simplelogin.io – simplelogin.io
- Email Routing with Cloudflare
- Namecheap Email Forwarding – If your domain registry service partner is Namecheap, you can use their own Email Forwarding Service.
In this guide, I will explain to you how to set up the business email with improvmx.com. You can use the same steps with forwardemail.net, simplelogin.io and Cloudflare too.
For your reference, I will give you some resources on how to set up email forwarding/routing and create business email addresses with forwardemail.net, Cloudflare, and Namecheap below.
For forwardemail.net – Go to this YouTube Video
For Cloudflare – Go to this YouTube Video
For Namecheap Email Forwarding – Go to this YouTube Video
Let’s move on and find out how to set up Email Forwarding with improvmx.com and use Gmail for sending and receiving your business emails for FREE.
Step 3: Setup Email Forwarding and access the business emails using Gmail.
# Create a new Gmail account or use the existing one
It is obvious that you need a Gmail account. You can use your existing one or create a new one for this for Free by Google.
Since this Gmail account is to be used to send and receive your business emails, I do recommend you create a new Gmail account for this. So then you can overcome the hassle with your other emails.
# Create free email aliases for your domain
Go to improvmx.com
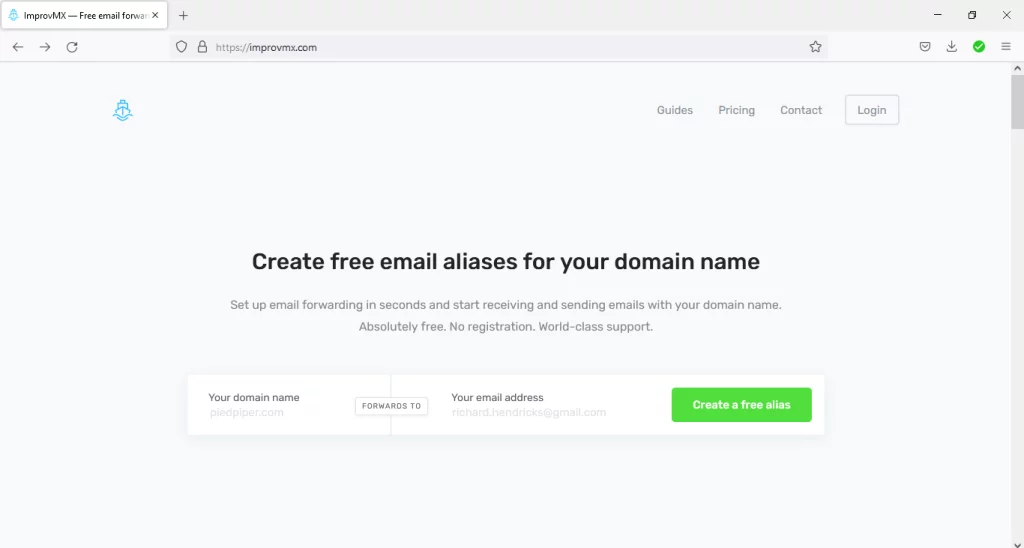
Type your domain name and Your email(Gmail) address.
Your domain name -> yourdomain.com (Your Business domain)
Your email address -> yourbusiness@gmail.com (The Gmail account you are going to use)
In my case, I will use,
For “Your domain name” -> a1saas.com
For “Your email address” -> a1saas.business@gmail.com
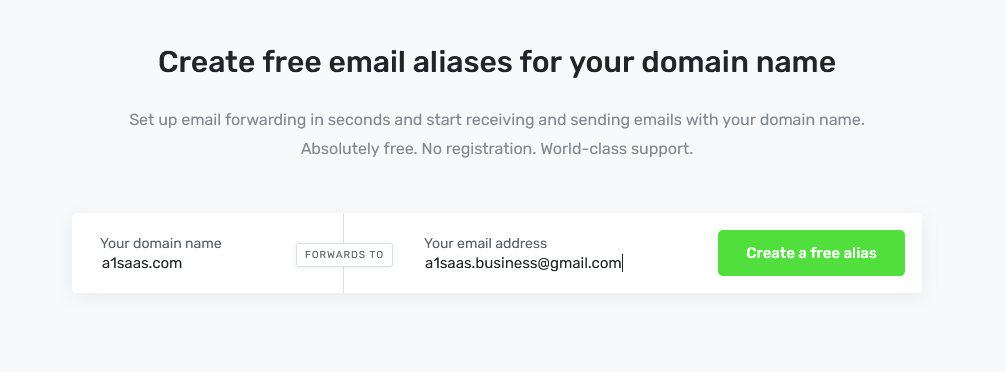
Then click on “Create a free alias”.
Note:
If you are redirected to a page like “page requesting to Connect to your Domain Registry Service partner(Namecheap or any)”, then click on the “Connect to ..” button.
# Validate your Gmail account with your forwarding service
You will be landed on this Dashboard page next.
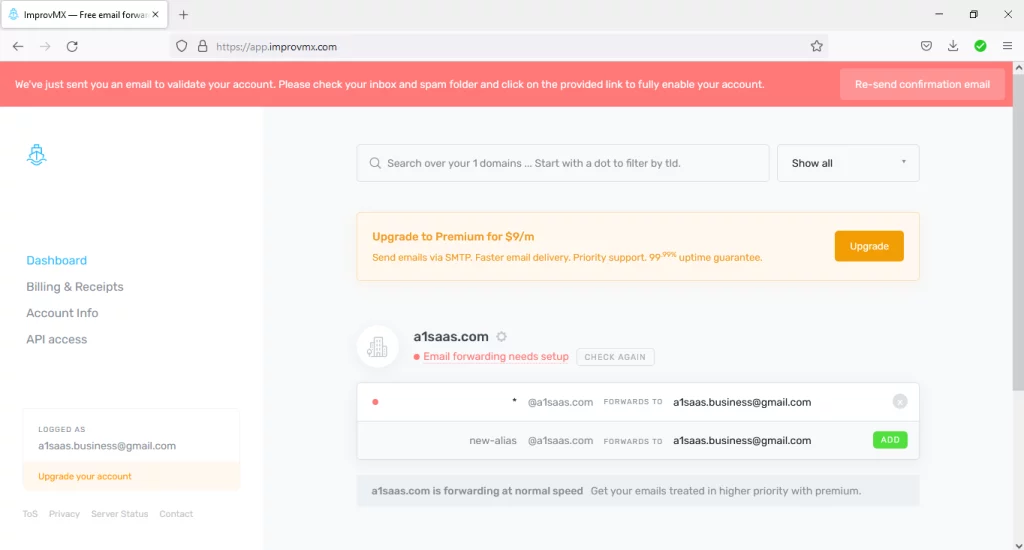
Go to your Gmail account and check a new email from ImprovMX subjected as “Validate your account”.
You can click on the “Re-send confirmation email” button shown on the above Dashboard page if you want to get another email.
Open the email and click on the link given in the email.
Then tick and accept the “Terms and Privacy Policy”. Tick all if you want and then click on “Validate your account “. You will be redirected to the above same page but with a green message bar on top of the page saying “Your email has been successfully validated”.
# Add Alias
Add your aliases. This means your business email addresses. In my case, I will add 2 aliases as “admin” and “services”. I have added the same Gmail account for all the business email addresses for my ease of reference.
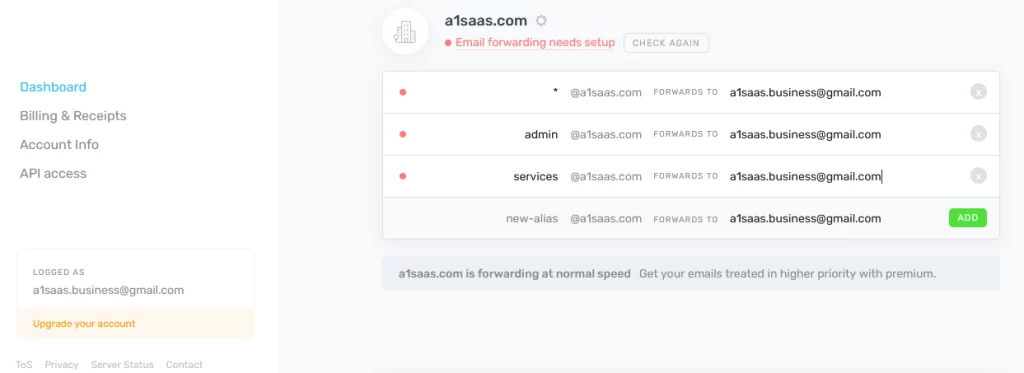
#. admin@a1saas.com forwarded to a1saas.business@gmail.com
#. services@a1saas.com forwarded to a1saas.business@gmail.com
# Setup DNS settings
Click on the red color “Email forwarding needs setup” and configure the DNS settings with your domain registry service partner.
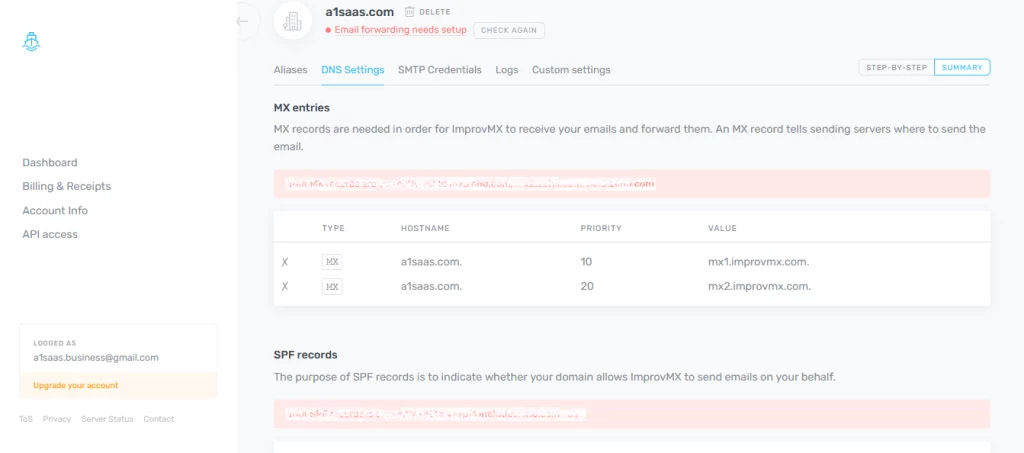
Log-in to your Domain registry service partner. Let’s assume the domain registry service partner is Namecheap for this guide. If your service partner is GoDaddy or any other service, don’t worry, the process is almost the same.
After login to Namecheap, choose your domain and then “Advanced DNS”
Under “MAIL SETTINGS”, select “Custom MX”. Copy the above two MX records, paste and enter them in the fields as below.
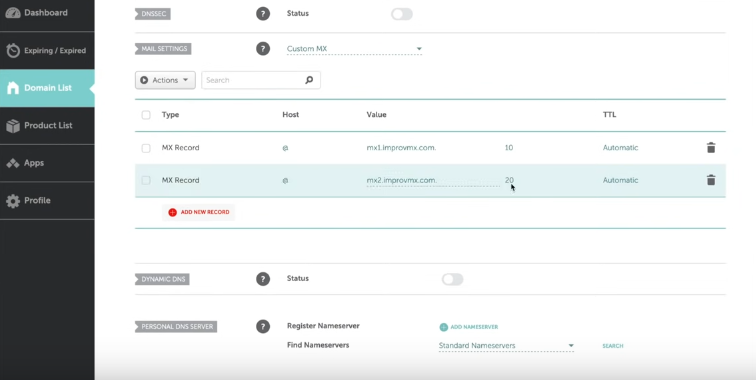
Then add your SPF.
Create a TXT record and add your SPF given. If you already have added an SPF record in Namecheap, then add “include:” keyword with the new SPF.
Ex:
If no SPF is added, add v=spf1 include:spf.improvmx.com ~all
If an SPF like v=spf1 include:spf.efwd.regiter-servers.com is already there, then add v=spf1 include:spf.efwd.regiter-servers.com include:spf.improvmx.com ~all
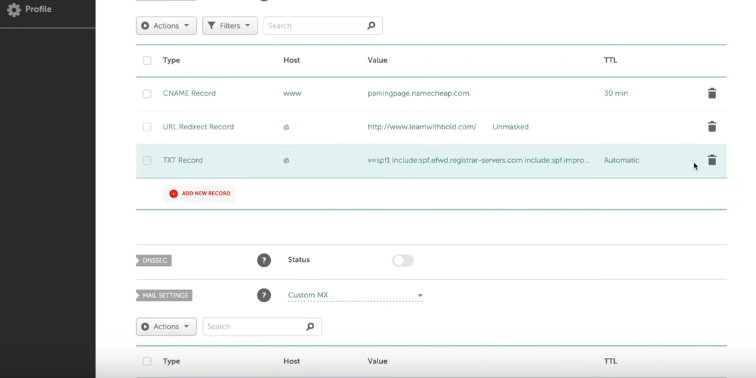
Setting up the DNS part is done. Let’s move to activate the email forwarding.
# Verify your Gmail account with your domain service
Go to the email account you used when creating a Namecheap account and check a Verification email from Namecheap received. Namecheap requires some verification to the domain to register with your business Gmail account.
Note that:
You have to check the emails in the account you used when creating the Namecheap account.
Open the verification email and click on the verification text or link given in the email. You will be redirected to the below Success! page of the Namecheap.
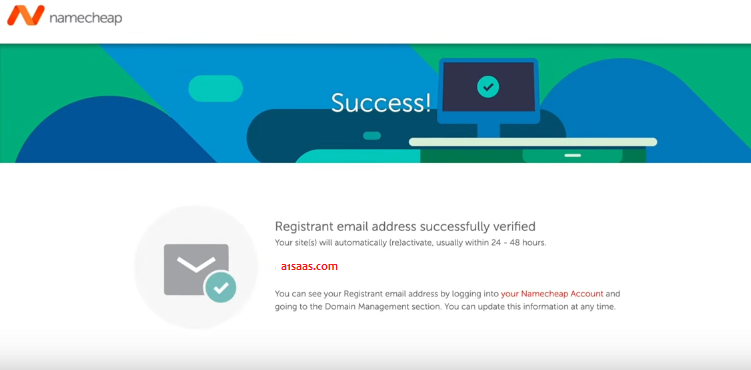
# Activate Email Forwarding
To activate Email Forwarding, go to the above ImprovMX – DNS Settings page again and click on the ‘CHECK AGAIN” button underneath your domain name. If you don’t see a green message as “Email forwarding active”, wait a few minutes till the DNS settings up and “CHECK AGAIN”.
When the DNS settings are up, you will see the page as below.
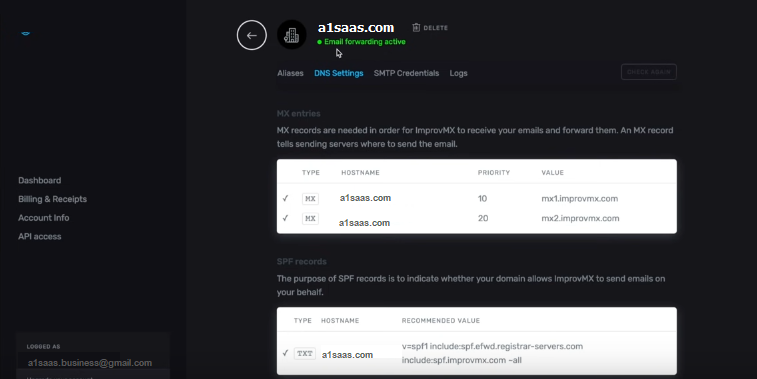
You are done. Great!
# Test Email receiving
Go to the Aliases tab of the above page, and simply click on the “TEST” button. Or you can send an email to your business email address(admin@a1saas.com) from another email account to test.
Go to your Gmail account(a1saas.business@gmail.com) and check whether the emails are received.
If you are not facing any difficulty up to this stage, then your business email receiving part(inbox/mailbox) is completed.
Those who send emails to your business email(admin@a1saas.com) will be received to your Gmail account(a1saas.business@gmail.com) now.
Great! Let’s move to the next part and find out how to send Emails from your business email address(admin@a1saas.com) using your Gmail(a1saas.business@gmail.com) account.
Step 4: Send emails from your business email address using Gmail
# Turn On Access to Less Secure Apps or Add 2-Step Verification
You have to turn on the “Less Secure Apps” feature or Add 2-Step Verification for this step.
Note that:
Google has disabled the Less Secure Apps feature on some Google accounts from May 30th, 2022. Therefore if this feature is not available in your Google(Gmail) account, add 2-Step Verification instead of that.
How to enable the “Less Secure Apps” feature:
Go to your Gmail account(a1saas.business@gmail.com), and click on your account avatar/profile image(right side on top of the page), then “Manage your Gmail Account”
Type “Less Secure app access” and select the setting or click on the “Security” tab -> “Less secure app access” -> “Turn on access”
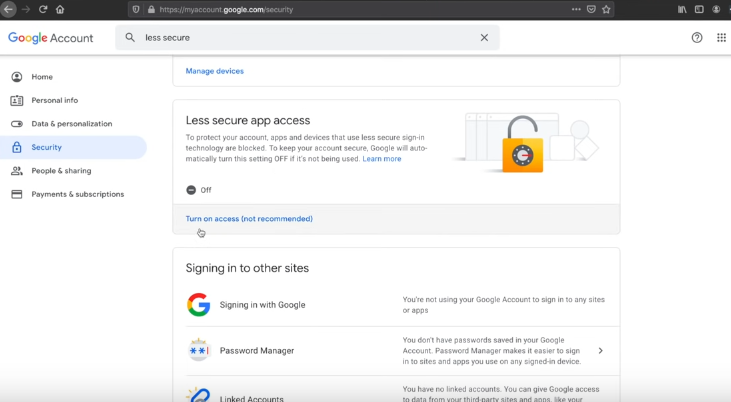
Turn On the “Allow less secure apps” as below image

How to add the “2-Step Verification” :
If the above-mentioned “Less Secure Apps” feature is not available or can not be enabled anyway, add this 2-Step Verification.
Go to your Gmail account(a1saas.business@gmail.com), and click on your account avatar/profile image(right side on top of the page), then “Manage your Gmail Account”
Type “2-Step Verification” and select the setting or click on the “Security” tab -> “2-Step Verification” -> follow the steps.
# Change Gmail settings for adding another email
Go to Gmail account(a1saas.business@gmail.com), inbox page -> “Settings” -> “See all settings”
Select the “Account and Import” tab
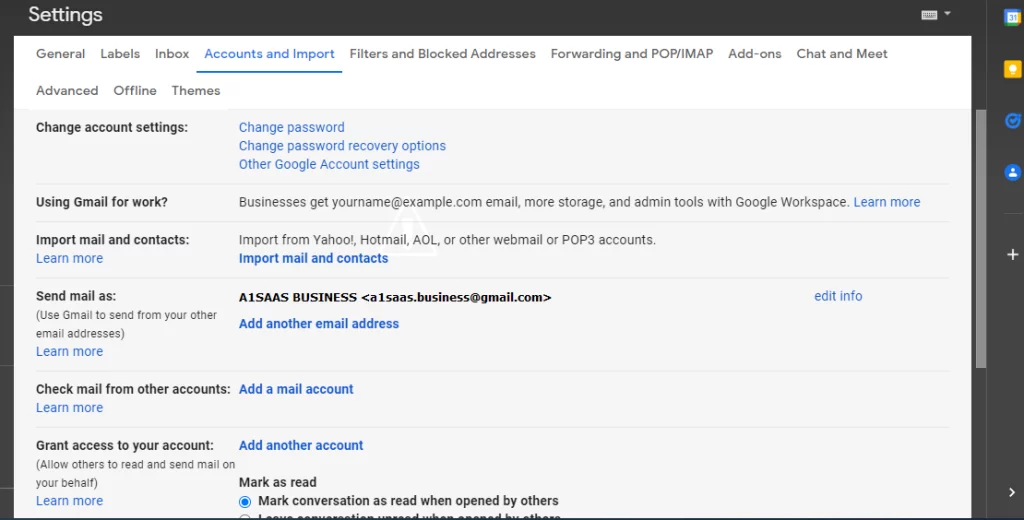
“Send mail as:” -> click on “Add another email address”
Add Name and Email Address as below.
Name : The recognition name(displaying name) of each email address.
Email Address : Your business domain email address
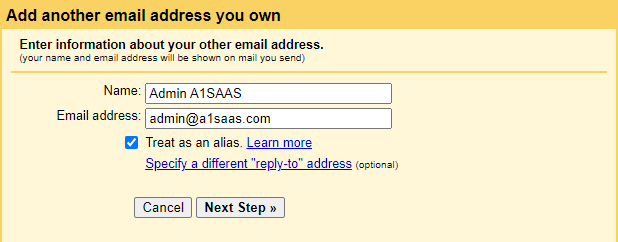
Tick, “Treat as an alias” and then click on “Next Step”
Enter details as below.
SMTP Server: smtp.gmail.com
Username: Your Gmail address, created for managing business emails. In my case, it is a1saas.business@gmail.com(The same account currently logged in)
Password: log-in Password for the above Gmail account.
Port: 587 and select Secure connection using TLS
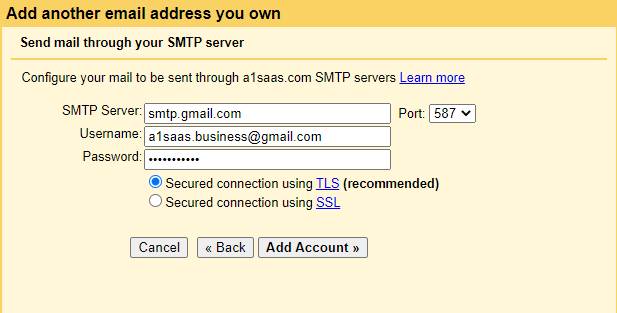
Note that:
If you have any other SMTP service, you can enter that SMTP server credentials too instead of the above Gmail SMTP details. So you can choose your own email sender service(SMTP) and send the emails via that service.
If you want to know how to create a FREE SMTP service(50,000 emails per day) with Amazon SES, use this guide.
# Add Account
After entering the details, click on the “Add Account” button.
If you see an authentication failed message due to “Less Secure Apps” access or 2-Step Verification, Turn On the access to “Less Secure Apps” feature(if it is available) or Add 2-Step Verification in the Security Settings of your Google(Gmail) account. If you want to know how to do it, go to the above “Turn On Access to Less Secure Apps or Add 2-Step Verification” sub-topic and follow the instructions given.
If you have received any security alert email to your Gmail(a1saas.business@gmail.com), read and accept as you are already aware of that and you did the security changes.
After the necessary changes are done, again click on “Add Account”
If the settings and credentials are correct, you will be landed on the below page.

You have to verify the confirmation code.
To verify, go to your Gmail account, and check a confirmation email received from Gmail. Simply open the Confirmation Email, copy the confirmation code and paste it into the field of the above page(shown above image). And then simply click on the “Verify” button.
Or
You can simply click on the link given in the confirmation email. That’s all.
All done. Congratulations!
You can send and receive your business domain emails using Gmail for FREE now.
# Test Email Sending
To test the email sending, go to your Gmail account(a1saas.business@gmail.com) and compose an email.
Click on the drop-down in the “From” field and you will see your business domain email address with your account Gmail address. Select your business domain email address. In my case, it is “A1SAAS ADMIN<admin@a1saas.com>”
Add a “To” email address, subject and a message body. Then send.
Now you have created FREE business emails and used them with your normal Gmail account. Great!
If you have faced any difficulties, feel free to comment below. I will answer you then.
By the way:
Upon the research I’ve done for you, the other three methods of creating free business emails have been explained below. If you wish, you can follow those 3 methods too.
Method 2: Configure your domain with Zoho Mail
Watch any of these videos to create Free business emails with Zoho Mail.
Method 3: Setup your business email with Email Hosting or Website Hosting Services
You can create your Business Email addresses with any Email Hosting Services and with some Website Hosting Services. Also, you can use it with Gmail or Webmail for Free.
Use the below resources to set up your business email using this method.
- Best Email Hosting Services of 2022
- Top Free Email Domain Name Providers(Compared)
- How to Make a Free Business Email Address with Bluehost and HostGator web hosting services
- How to Create A Business Email For Free and Use It with Gmail
Method 4: Setup “Hestia” open-source Linux web server control panel, create your Business Email Addresses with “Hestia” and send & receive emails using the “Hestia” Webmail.
You can create your Business Email Addresses with the “Hestia” control panel and Send & Recieve your business emails using the “Hestia” Webmail itself. It is open-source, you can configure the “Hestia” totally free. You can set more business domains and create more business email addresses for any of the domains. You no need to configure or get any of the outside services(third party) for the mailbox/inbox feature. “Hestia” has the Webmail feature itself to send and receive business emails for any of your domains configured.
Also, you can configure the websites with the “Hestia” control panel. “Hestia” control panel is a great control panel that has more advanced features for web hosting, emails, and much more.
Watch the below videos to setup the “Hestia” control panel.
That’s it! You’ve now created free business email addresses at your own business domain.
Free Business Email Conclusion
Having professional/business email addresses for your business is giving you a boost to your business growth. Also, it looks more professional. It will promote your business and give you more profit anyway. So, your customers/clients can be happier and they can actively and reliably join your business as well.
Now you know that your Email Address reflects your entire Business very well.
I did some research on creating free business email addresses. So in this step-by-step guide, I have shown you the results of the research and the step-by-step guides to create your domain business emails for 100% FREE. If you know how to do it very well, you can make it successful.
I hope you enjoyed this step-by-step guide on how to create business emails for FREE. If you have any questions, leave a comment below and I’ll be happy to answer them.
Good Luck!

Hi – Thanks for this guide, but what to do now, because Google has disabled the “Allow less secure apps” option for regular Gmail accounts, and will disable it for Google Workspace accounts as well (date still TBD). All I want to do is use the “Send email as” in my Gmail. Any workaround?
You are welcome! Machi,
Add “2-Step Verification” and go on.
Go to your Gmail account, and click on your account avatar/profile image, then “Manage your Gmail Account”
Type “2-Step Verification” and select the setting or
click on the “Security” tab -> “2-Step Verification” -> follow the steps.
If you are facing any trouble or unable to make it happen according to your requirement, please let me know, I will help you to make it a success.
Thank you.
Everyone loves it when folks get together and share ideas. Great blog, keep it up!
Thank you, Lucius!
Very good page, keep it up.
Thank you, Francisco